Monday, August 24, 2009

How-To: Clean cartridge bearings

Ok so here is a run down of what cartridge bearings are, why you should keep them clean, and how clean them. Cartridge bearings are a complete bearing unit. They are used in many different places on a bike from the bottom bracket to the wheels and headset ect. Some you might not be able to get access to for proper cleaning, this might include cartridge bearings in your bottom bracket or suspension pivots.
Cartridge bearings consist of an inner bearing race, ball bearings (often in their own retainer), an outer race, and seals of some sort.
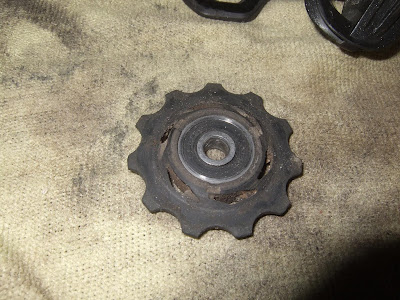
Today I overhauled the bearings in my XO rear derailleur pulleys. It should be pretty obvious by the photos why it needed to be done. Benefits are much longer bearing life which leads to less rotating resistance and catastrophic failure.
To properly service a cartridge bearing you need to be able to access both rubber seals. If you can't and it is turning rough (or not turning at all) then chances are you just have to replace it since pressing out a bearing usually damages it in some capacity. I may cover cartridge bearing removal and installation in a later post.

So first things first, I removed the derailleur from my bike and removed the pulley wheels from my derailleur.
Step 1: Isolate the bearing you are going to be working on.


Step 2: Remove any dust shrouds or bushings that might be in the way. You can now see the cartridge bearing complete with rubber seal. The rubber seal has a number on it which can be used at a bearing shop or bicycle shop if a new bearing is needed.

Step 3: Remove the rubber dust shields (both sides will have one in some capacity). I use a pin and gently pry under the seal and lift the cover off. Be careful not to do any damage to the seal. Most seals have a brass or metal core that can be easily bent.


Step 4: Inspect the bearing. This is a really good, really dirty example. To think I also did this in June, didn't take long for the dirt to find its way back in. I also clean the rubber/brass dust shields with a rag being careful not to bend them.


Step 5: Flush the bearing out with degreaser. I use Finish Line Speed Degreaser because it blasts out under pressure and doesn't need to be rinsed. You can also use a chain citrus degreaser but be sure to rinse it well. I also blast out the bearing with an air compressor nozzle to ensure thorough dirt/old grease removal.


After cleaning.


Step 6: Pack the bearing with grease. Run a liberal bead all along the ball bearings. Having a grease gun really helps to make this clean and easy. Not rocket science to do it without one just a little bit messier. Make sure you use a good quality bearing grease. Pack both sides equally.
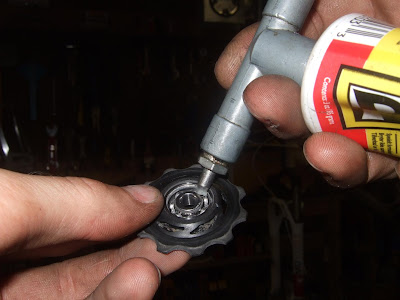

After packing.
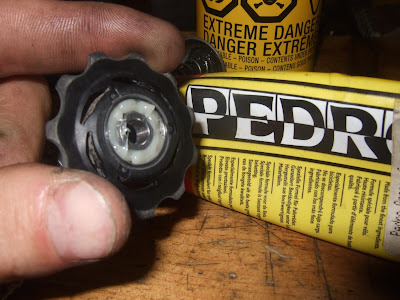

Step 7: Spin the bearing in your fingers to work the grease into the balls. If there are any grease voids opened up by this then squirt a little more in to ensure full coverage. Push the dust seals back into place (brass side in) and wipe off excess grease.


You're done! Just that easy. Cartridge bearings can be slightly high maintenance. It's not hard for them to become contaminated. Check areas like your headset, pulleys, and bottom bracket regularly by turning them with your fingers and feeling for roughness. Sometimes even after cleaning they will be rough. If the race or balls are scratched then there is nothing you can do other than replace them.

Monday, August 10, 2009

O-Cup #6. Mountainview

Ohhhhhhhhhh k. So maybe some people are waiting to read my update from the O-Cup this weekend. I am going to keep this fairly short because there really isn't that much to tell. Legs felt awesome in pre-ride the day before and I did 2 tempo laps in the nice weather. I was experimenting with running a lower 25psi tire pressure, down from my usual 29. The bike felt great. I was also focusing on shifting all of my upper body weight forward and onto my inside hand while cornering since I seem to have gotten the hang of the outside foot down technique. Let me just say the 2 compliment each other really well. Weight forward and on inside hand really puts your weight where it should be. Seems to automatically bring your saddle to your inside thigh which I have been struggling with over the past couple months. Anyways...........little off topic there.......
The race was going well for the first lap or so. Got a decent start and sat about 10th in the first singletrack. Was regretting my 1.8 Maxxis Medusa mud tires for the first 1/2 lap but then we hit the super muddy stuff and was glad that for that lap at least I had some traction. I made up some spots and I think I was sitting around 6th but it all came unglued. Felt like I was riding on top of a big sponge. Power put into the cranks didn't seem to be moving me forward at all. Was it the heat, was it the tires, was it my crappy legs?? Who really knows, just a bad day I guess. Excuses are lame so I'll leave it at that. Only finished 3 of 5 laps......
Anyways told you it would be short. Gotta leave you longing for more
Bueno

Thursday, August 6, 2009

South Carolina 2010 Update

I have chosen a week for the 2010 South Carolina mountain bike tour. It will be March 27th - April 3rd.

CLICK HERE FOR TOUR INFO

I am also now taking reservations for the house down south next spring. Price this time is going to stay the same at $160 CAD/week/person. Please let me know if you have any special room requests or anything of that sorts. Master bedroom goes to the first couple to book on any given week. There are 3 couple appropriate rooms. Price for a couple sharing a room also remains at $200 CAD/week/couple. To book you need to put a $50 deposit for each week with the remaining balance due February 1st.

Weeks available:
February 27th - March 6th
March 6th - March 13th
March 13th - March 20th
March 20th - March 27th
March 27th - April 3rd (Booked for Tour)
April 3rd - April 10th
April 10th - April 17th
April 17th - April 24th
April 24th - May 1st

This year I am limiting the numbers to 12 singles or 10 singles and 3 couples.


*Small print* Deposit is 100% refundable until February 1st, 2010. After February 1st the total balance is paid and is non-refundable after February 15th ,2010. Any money paid including deposit and balance are 100% refundable until February 14th, 2010.

CLICK HERE FOR HOUSE INFO