The headset of your bicycle is one of those components that is frequently overlooked. Although headsets don’t require the regular maintenance high wear items like your drivetrain do, it is still important to keep the bearings in good shape and it's very important that it is properly adjusted.
There are a few different types of headsets but fundamentally they function the same. Today we are dealing with a very common type of headset which goes by a few different names. I refer to these as “zero stack”, they can also be called “semi-integrated” or “internal”.
Here are the 3 main types of headset.
Integrated – often found on lower end bicycles these bearings run directly against the head tube of the frame. Therefor the bearing races cannot be replaced.
Zero Stack – probably the most common headset on most of todays modern bicycles. The head tube is designed to hold a cartridge bearing inside of it. This mostly hides the bearing from sight. The bearing is easy to replace if it gets worn out or damaged.
Conventional – Common up until about 10 years ago, conventional headsets are a self contained unit. Often “loose ball” style bearings complete with bearing races. This headset is pressed partially into the headtube but most of the headset remains visible.
Zero stack is really the most sensible headset option. There are a few major advantages to this system.
-you can replace the bearing very easily, and cheaply.
-the headset is very low profile which allows you to run your stem closer to your frame. This means handlebars can be lower in height which allows you to tailor the fit of your bike better.
-since the bearing is low profile, head tubes can be made larger which increases frame stiffness and steering response.
This How-To will address headset removal, cleaning, installation, and adjustment. Headsets can also be a common source for creaks and squeaks so this service will reduce the likelyhood of those as well.
Tools required (left to right):
1 – rag for cleaning
2 – Allen keys
3 – all purpose grease
* - optional, makes life easier.
*4 – long zip tie
*5 – side cutters
Step 1
A bike stand always makes life easier. With your bike secured in the stand, remove the front wheel to take some weight off the front end.
Step 2
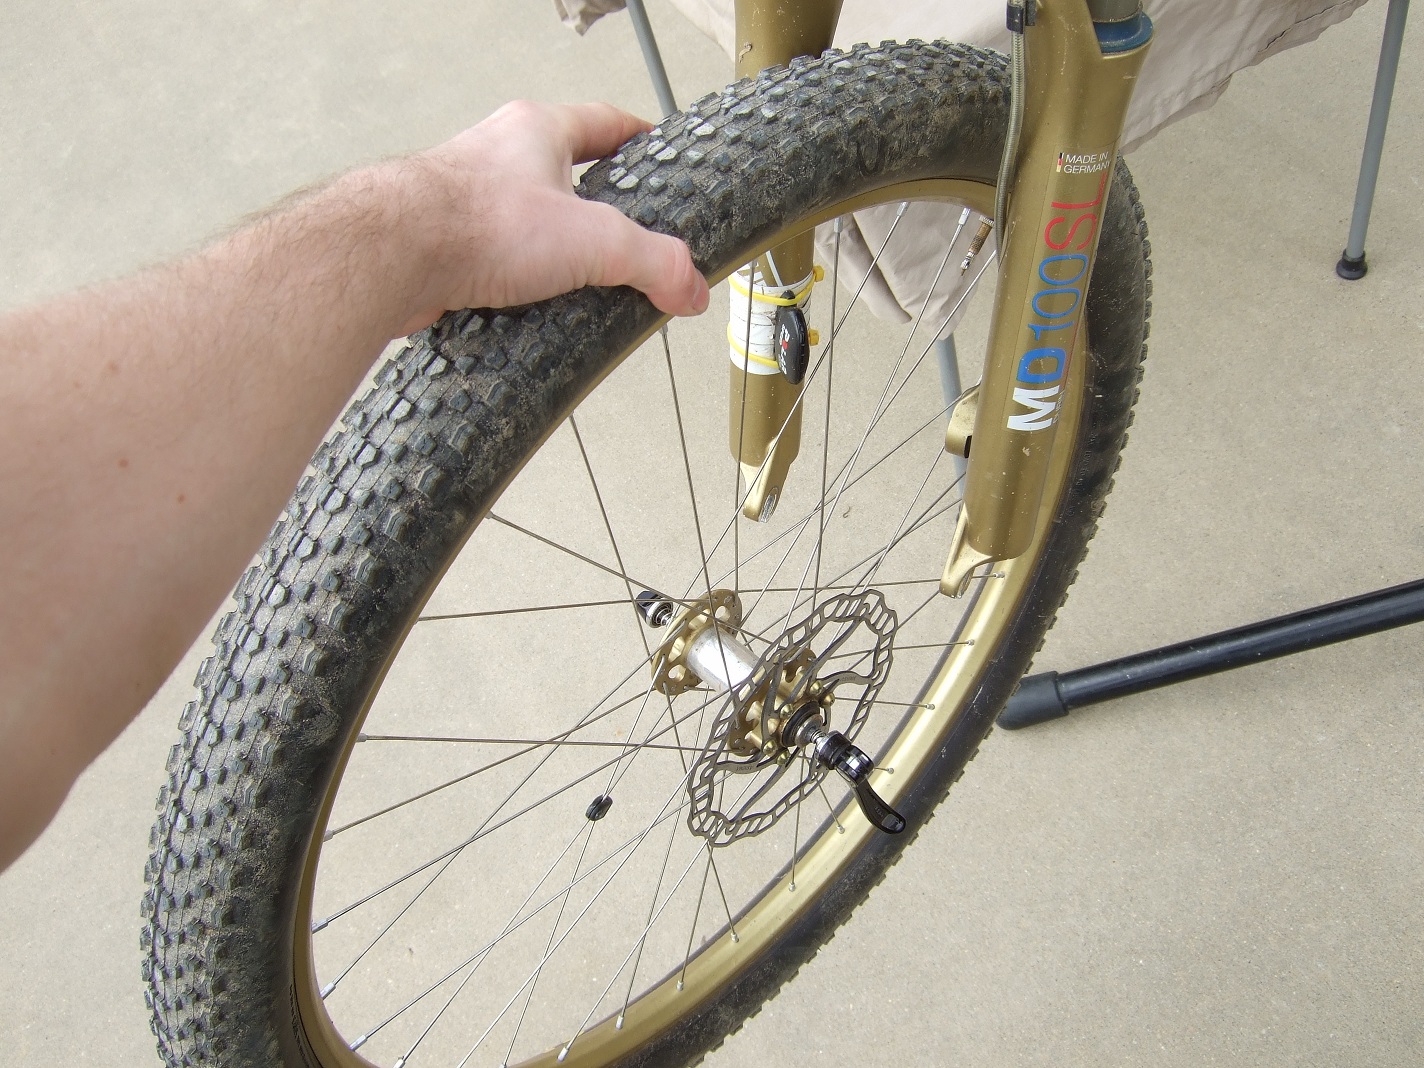
Loosen the stem pinch bolts.
Step 3
Remove the top cap. At this point you must hold onto your fork or it could drop unexpectedly out of your bike and onto the ground.
Step 4
Determine whether your fork steerer tube is properly adjusted. The deal here is that your fork steerer MUST NOT touch your top cap. The reason for this is that the top cap adjusts the load on the headset bearing. If the steerer tube of the fork is resting against the top cap then the headset cannot be tightened any further.
In the illustration below you can see that when you tighten the top cap it squeezes the bearing of the headset. If your fork steerer is too long you won’t be able to tighten the headset enough. You can adjust the length of the steerer either by adding spacers or by cutting the steerer tube shorter.
If the steerer is too short then the top pinch bolt on your stem won’t tighten the stem onto the steerer tube of the fork and you could crack your stem. The top pinch bolt of your stem needs to clamp down onto steerer for the most secure fit.
Step 5
Begin disassembling your headset. Start by removing your stem.
Step 6
As you are removing various bits of your headset it is a very good idea to set them aside in the order that you are taking them off the bike. That way you know how it all goes back together.
With your spacers and headset dust shield removed now you can remove the small taper ring. Sometimes you have to tap on the top of your fork steerer in order to knock it free. Use either your hand or a rubber mallet.
Step 7
Now you can use that long zip tie to hold the fork in place. That way you don’t have to remove the front brake.
Step 8
Now we are getting into the real meat ‘n potatoes of this How-To. You can remove the top headset cartridge bearing. You should be able to just pull it out with your fingers. Might have to wiggle it around a little.
Step 9
Remove the bottom bearing much like you did with the top bearing. The bottom bearing is much more exposed to dirt and water so it is very likely that this bearing will be in worse shape than the top bearing. It may also be a different size since many modern bikes/forks come with tapered head/steerer tubes now.
The bottom bearing sometimes comes out with the fork as well. So you might see it on the base of the steerer tube.
Step 10
Set everything aside. Here you can see that I have kept it all in order.
Step 11
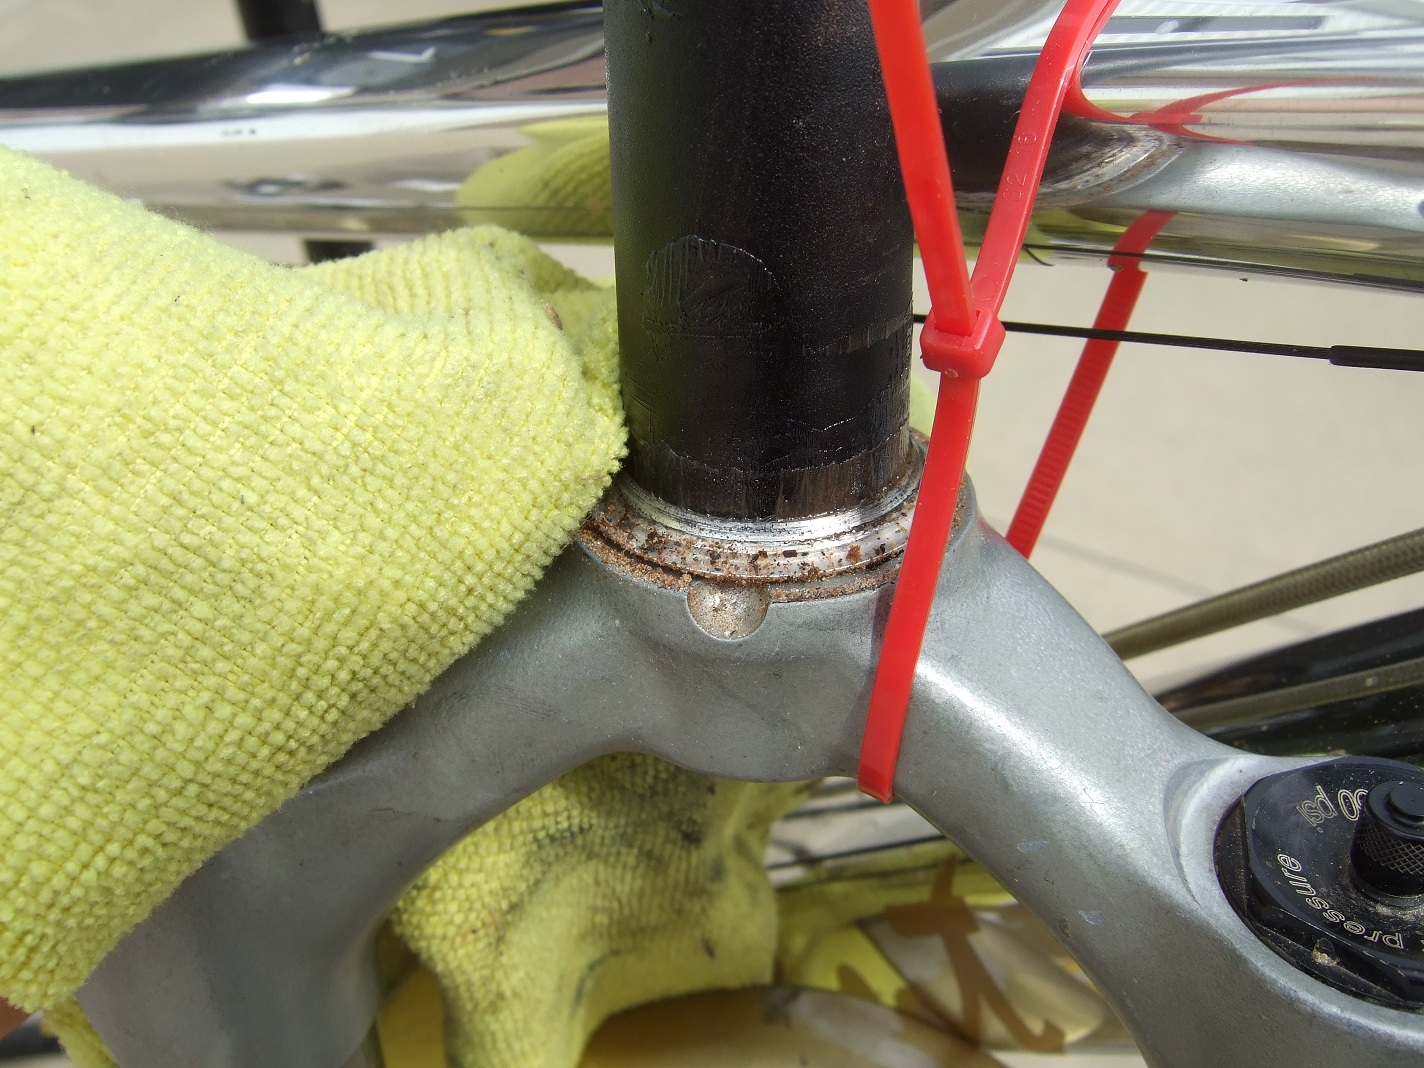
With everything apart, now is the time to clean everything up. Anytime you have moving parts interacting with each other you need to have very clean mating surfaces. This reduces the risk of contamination and any number of undesirable crunchy, clicking noises when stuff does start moving or is stressed.
Step 12
Roll each bearing in your fingers and make sure they move freely. If you want to be a superstar then some bearings can be flushed out and re-greased. Check out “How to clean cartridge bearings” to get the jist of this process.
If the bearings are notchy or rough then chances are it is time to replace that sucker. The good news is that they only cost about $30. The beauty of cartridge bearings.
Step 13
Now that everything is cleaned up and functioning well you can start putting it all back together. It is a very good idea to have a film of grease on any mating surface of a bearing. Helps to reduce creaks big time. You can use your all purpose grease for this job. Take some grease and roll the bearing around in your fingers giving every surface a thorough coat.
Step 14
Re-install the bottom bearing. Look to see if there are any tapered surfaces on the bearing. If there are make sure they are orientated correctly. Give them a test fit, it will be obvious which way it goes if you forgot to keep track during disassembly.
Slide the bottom bearing onto the fork steerer.
Step 15
Re-install the top bearing. Make sure it is seated squarely in the frame. You just push it in with your fingers.
Step 16
Install the fork back into the head tube of the bicycle. Make sure that when you are pushing the steerer through that it doesn’t knock the top bearing out onto the ground or you’ll have to clean/grease it all over again.
Also when you install the fork make sure that all the cable and hoses for your brakes and shifters are correctly positioned.
Step 17
Make sure the fork is seated in the frame of the bicycle. Check for any weird looking gaps at the bottom bearing. Also double check that all the shift and brake housing and hoses are orientated correctly.
Step 18
Install all the little spacers and rings in the order you removed them. Don’t worry if the small taper ring doesn’t push down all the way. When you tighten everything down it will push into place. You can grease the taper ring as well.
Step 19
Slide your stem back on and loosely install the top cap.
Adjust your headset
Step 20
Now you can begin the process of actually adjusting your headset properly. When you know the process this is a job that takes about 60 seconds.
Remove your bike from the stand and put your front wheel back on. Right now your stem and front wheel should move independently of each other because the stem pinch bolts are still loose. This is important.
We learned before that when you tighten the top cap, and your stem bolts are loose, it will tighten the load on the headset. Since we just had everything apart I suggest that you tighten the top cap to about a 6 out of 10 (10N-m approx) so that everything gets squished together nice and square. Then loosen the top cap right off again and go from there.
You want enough load on the bearing that the bars spin freely but so the bearing doesn’t have play. Adjust the bearing pre-load via the top cap to where you think it is a good compromise. You can test the bearing buy snugging down one of the stem pinch bolts. Turn the handlebars side to side through their full range of motion. If the bearing feels rough then it is too tight.
To test if the bearing is too loose you can squeeze the front brake lever and rock the bike back and forth (front to back). Place your hand between the bearing and the head tube of the frame to detect any knocking of the bearing.
Keep fine tuning that sucker so that there is no play in the bearing but the bars are still buttery smooth when you turn them.
Step 21
Now that the bearing preload has been properly adjusted you can make sure your stem is aligned with your front wheel. Pretty much just eye-ball it and tighten the stem pinch bolts to secure it in place. If later you find that it is actually crooked, or you have a crash and they turn, you can always loosen the stem pinch bolts and straighten the stem without affecting the preload on the headset bearing because you are not adjusting the top cap.
That’s it, you’re all done! Now you can turn like a boss and your bike should run a little quieter.
Monday, March 18, 2013
Sunday, July 22, 2012
How-To: Install new cables/housing
Ohh the mysteries of cable housing…. Often feared, underestimated, misunderstood. Today we are going to take a look at how to install new derailleur cable housing and also the cable itself.
I think it is important to change everything at once when dealing with shift cables. I mean the supplies aren’t expensive and you’re in there anyway, might as well do it all. The most expensive part of cables/housing is the labour you have to pay to get it done. Even with labour and parts we are not talking about a lot of money here. There are a few reasons why you might want to learn how to do this yourself. You could be dealing with a very short time frame, it’s good to be self sufficient, you like to know how to service your bike properly, most shops employ terrible bike mechanics (sad but true).
Okay so whatever your reasons I’ll show you how to do it like a superstar. This how-to will illustrate the replacement of a rear derailleur cable/housing. The steps would be the same for front derailleurs.
---------->On a note before we start. Frayed cables, damaged housing, broken cables……..all of these things are extremely sharp and pose a very serious threat. I can’t tell you how many times I have poked my fingers with cable strands or pieces of old housing. I had a strand go right through my thumb, it sucks! So whenever you are cutting cables/housing or disposing of old cable/housing make sure you do it properly and leave nothing behind. You don’t want to find a 1” strand of razor sharp steel cable with the bottom of your bare foot!
Product recommendations
Housing – Anything that is pre-lubed. It means there is grease all along the inside which makes shifting much smoother. Jagwire makes really nice stuff and is the best bang for the buck. 4mm thickness is best for shift. It is smaller and handles bends much better. 5mm housing is typically used for brake cables and is constructed differently.
Housing end caps – Make sure you get the sealed type. They have little rubber o-rings which keeps dirt out of your greased housing. Also make sure they are the appropriate size for the diameter of your housing.
Cables – spend the extra dough and get stainless. They never get contaminated which is a major source of friction. Teflon cables are overrated but still get the job done. Shift cables are around 1.2mm and brake around 1.5mm thickness.
End caps – anything goes here. You can solder the ends, buy fancy caps……whatever you do make sure the ends are sealed or they will fray very quickly. Ditch the electrical tape and do it proper-like.
Tools required (left to right):
1 - cable end caps
2 - housing end caps
3 – cables
4 – housing
5 – side cutters
6 – Allen key(s)
7 – screwdriver
8 – flaring tool
9- cable/housing cutters
Step 1
Shift your derailleur into the smallest cog and loosen the cable pinch bolt on the derailleur with your 5mm Allen key.
Step 2
Cut off the old derailleur cable end cap so that you can easily slide the old cable out of the old housing.
Step 3
Remove the plug in your shifter to gain access to the cable. This plug is very easy to get out but it does vary from shifter to shifter. Send me a message if you need help figuring out how to get access to your shifter cable. Keep in mind all (99%) of shifters will have a superficial cover that does not require you to disassemble the shifter mechanism to gain access to the cable.
*Set your shifter plug in a safe place so you don’t lose it.
Step 4
Push the old cable through the shifter. Sometimes the head of the cable gets stuck in its little cradle in the shifter and you have to jiggle it to get it out. Make sure your shifter is still set on the smallest cog or you will not be able to remove or install your cables. **If you have an old “rapid rise” style rear derailleur then you need to be in your largest cog in the back. Pretty much the rule with either style is that your derailleur/shifter needs to have all cable tension released.
Step 5
Throw out your old cable. Best way is to spool it up like in the photo and tuck the end through the middle of the spool a few times so that it wont unravel. *Remember this stuff is seriously sharp!
Step 6
Take a look at your old housing. Is it the right length? You should be able to rotate your handlebars freely without the housing being so short that it pulls on the shifter, or so long that it can get snagged on a tree. Rear suspension should be able to compress through its entire stroke without straining the housing. Rear derailleurs should be able to float freely.
Remove all of your old housing. Use your side cutters if there are any zipties holding things in place. *Remember, old housing ends can be sharp too!
Set these pieces aside and arrange them in order. Assuming they were the right length, you will be using them as templates for cutting your new housing.
Step 7
Using your old lengths of housing as a guide, cut your new housing to size.
Step 8
Cutting the metal housing will leave it ovalised. Using the inner portion of most cable cutters (or flat pliers), squish the housing so that it is round again.
Step 9
Cutting your housing might make the inner plastic sleeve crimp shut. Take your flaring tool and round out the inner sleeve so that you can easily pass the new cable through. If it is really crimped shut you can use a sharp pin to open up the plastic sleeve before flaring (or push the cable through the other side to open up the sleeve).
Step 10
Thread your new cable through your shifter. Remember your shifter must be in the smallest cog, if you look though the plug hole you should see the light at the end of the tunnel which gives you something to aim for. Sometimes the end of your cable can get hung up as you try and push it though. It might take you a couple tries.
Step 11
Make sure the head of your cable is seated properly in its cradle in the shifter. You might have to jiggle it a little for it to sit in place.
Install your new segments of housing onto the bike. If you were ever wondering, the proper order for your shift and brake housing to lay in place from your handle bars it goes like this:
Looking at your bike from the front, outside to inside-
Front Brake
Rear Brake
Front Shifter
Rear Shifter
Slide the new cable all the way through the new housing segments.
Keep medium tension on the cable when tightening the pinch bolt so that the cable is taught.
Check the tautness of the cable, it shouldn’t have too much slack. This is how the cable should normally sit when you are in your smallest cog on the back.
Now we are going to stress the system and alleviate most of the “stretch” that may occur.
Grab your derailleur very firmly so that it cant move. Now shift a bunch of gears on your shifter (holding the derailleur in place) so that it puts a bunch of pressure on the cable/housing. Should be about an 8 or 9 on the firmness scale. Now release the gears and repeat a few times.
Comprehension (oh boy)
So conventional thought would be that your cables are stretching. This is pretty much completely false. Any decent cable is pre-stretched at the factory. What is happening is the housing is compressing and pushing into the housing end caps. The more segments of housing you have, the more slack you will get in the cable after stressing the system. If you ever change the cables on a bike that has full length housing (like a Scott Spark) you will see that there is still very little slack in the system even after stressing it. The fewer the housing segments, the less the system is affected by load. Not to say that full housing is better, once any system is initially stressed (properly) there will be very little housing compression in the following weeks/months. With our barrel adjusters turned all the way in we have lots of room to take up any small amounts of slack in the cable that might develop by turning them out. Phew!
Step 17
Loosen the derailleur cable pinch bolt and take up any slack that may have developed by stressing the system. Holding the cable taught, re-tighten the pinch bolt. Check the tension once more, it should be as it was before we stressed the system.
Step 18
Cut off the excess cable. Leave enough extra in case you need to make an adjustment but not so much that it can get caught on something.
Install your cable end cap. I can pinch the end cap with the inside of my cable cutters. Since these are brake end caps on a derailleur cable they are a little too big so I extra-secure them with a final two pinches with the side cutters.
That’s it, you’re done! Enjoy your buttery smooth shifting.
Post in the comments if you have some extra tips!
Stay tuned.
Benno
I think it is important to change everything at once when dealing with shift cables. I mean the supplies aren’t expensive and you’re in there anyway, might as well do it all. The most expensive part of cables/housing is the labour you have to pay to get it done. Even with labour and parts we are not talking about a lot of money here. There are a few reasons why you might want to learn how to do this yourself. You could be dealing with a very short time frame, it’s good to be self sufficient, you like to know how to service your bike properly, most shops employ terrible bike mechanics (sad but true).
Okay so whatever your reasons I’ll show you how to do it like a superstar. This how-to will illustrate the replacement of a rear derailleur cable/housing. The steps would be the same for front derailleurs.
---------->On a note before we start. Frayed cables, damaged housing, broken cables……..all of these things are extremely sharp and pose a very serious threat. I can’t tell you how many times I have poked my fingers with cable strands or pieces of old housing. I had a strand go right through my thumb, it sucks! So whenever you are cutting cables/housing or disposing of old cable/housing make sure you do it properly and leave nothing behind. You don’t want to find a 1” strand of razor sharp steel cable with the bottom of your bare foot!
Product recommendations
Housing – Anything that is pre-lubed. It means there is grease all along the inside which makes shifting much smoother. Jagwire makes really nice stuff and is the best bang for the buck. 4mm thickness is best for shift. It is smaller and handles bends much better. 5mm housing is typically used for brake cables and is constructed differently.
Housing end caps – Make sure you get the sealed type. They have little rubber o-rings which keeps dirt out of your greased housing. Also make sure they are the appropriate size for the diameter of your housing.
Cables – spend the extra dough and get stainless. They never get contaminated which is a major source of friction. Teflon cables are overrated but still get the job done. Shift cables are around 1.2mm and brake around 1.5mm thickness.
End caps – anything goes here. You can solder the ends, buy fancy caps……whatever you do make sure the ends are sealed or they will fray very quickly. Ditch the electrical tape and do it proper-like.
Tools required (left to right):
1 - cable end caps
2 - housing end caps
3 – cables
4 – housing
5 – side cutters
6 – Allen key(s)
7 – screwdriver
8 – flaring tool
9- cable/housing cutters
Step 1
Shift your derailleur into the smallest cog and loosen the cable pinch bolt on the derailleur with your 5mm Allen key.
Step 2
Cut off the old derailleur cable end cap so that you can easily slide the old cable out of the old housing.
Step 3
Remove the plug in your shifter to gain access to the cable. This plug is very easy to get out but it does vary from shifter to shifter. Send me a message if you need help figuring out how to get access to your shifter cable. Keep in mind all (99%) of shifters will have a superficial cover that does not require you to disassemble the shifter mechanism to gain access to the cable.
*Set your shifter plug in a safe place so you don’t lose it.
Step 4
Push the old cable through the shifter. Sometimes the head of the cable gets stuck in its little cradle in the shifter and you have to jiggle it to get it out. Make sure your shifter is still set on the smallest cog or you will not be able to remove or install your cables. **If you have an old “rapid rise” style rear derailleur then you need to be in your largest cog in the back. Pretty much the rule with either style is that your derailleur/shifter needs to have all cable tension released.
Step 5
Throw out your old cable. Best way is to spool it up like in the photo and tuck the end through the middle of the spool a few times so that it wont unravel. *Remember this stuff is seriously sharp!
Step 6
Take a look at your old housing. Is it the right length? You should be able to rotate your handlebars freely without the housing being so short that it pulls on the shifter, or so long that it can get snagged on a tree. Rear suspension should be able to compress through its entire stroke without straining the housing. Rear derailleurs should be able to float freely.
Remove all of your old housing. Use your side cutters if there are any zipties holding things in place. *Remember, old housing ends can be sharp too!
Set these pieces aside and arrange them in order. Assuming they were the right length, you will be using them as templates for cutting your new housing.
Step 7
Using your old lengths of housing as a guide, cut your new housing to size.
Step 8
Cutting the metal housing will leave it ovalised. Using the inner portion of most cable cutters (or flat pliers), squish the housing so that it is round again.
Step 9
Cutting your housing might make the inner plastic sleeve crimp shut. Take your flaring tool and round out the inner sleeve so that you can easily pass the new cable through. If it is really crimped shut you can use a sharp pin to open up the plastic sleeve before flaring (or push the cable through the other side to open up the sleeve).
Step 10
Thread your new cable through your shifter. Remember your shifter must be in the smallest cog, if you look though the plug hole you should see the light at the end of the tunnel which gives you something to aim for. Sometimes the end of your cable can get hung up as you try and push it though. It might take you a couple tries.
Step 11
Make sure the head of your cable is seated properly in its cradle in the shifter. You might have to jiggle it a little for it to sit in place.
Step 12
Pop on your new cable housing end caps. Make sure they are the sealed type, it is worth the extra money since they will keep your shifting smooth much longer.Install your new segments of housing onto the bike. If you were ever wondering, the proper order for your shift and brake housing to lay in place from your handle bars it goes like this:
Looking at your bike from the front, outside to inside-
Front Brake
Rear Brake
Front Shifter
Rear Shifter
Slide the new cable all the way through the new housing segments.
Step 13
Re-install the shifter plug.
Step 14
Screw in your barrel adjusters. There might be one at your rear derailleur and one at your shifter. Turn them in as far as they will go (like a screw) and then back them off a ½ turn.
Step 15
Tighten down the shift cable at the derailleur. It is very important that you thread the cable on the correct side of the bolt. Usually there is a give-away, like a notch or slot milled into the derailleur. Also make sure the pinch bolt plate is orientated correctly so that the cable won’t slip.Keep medium tension on the cable when tightening the pinch bolt so that the cable is taught.
Step 16
Ohh baby this is one very important step! This separates the slackers making $10/hour at the shop to the pros making $11/hour at the shop…..Check the tautness of the cable, it shouldn’t have too much slack. This is how the cable should normally sit when you are in your smallest cog on the back.
Now we are going to stress the system and alleviate most of the “stretch” that may occur.
Grab your derailleur very firmly so that it cant move. Now shift a bunch of gears on your shifter (holding the derailleur in place) so that it puts a bunch of pressure on the cable/housing. Should be about an 8 or 9 on the firmness scale. Now release the gears and repeat a few times.
After you are done stressing the system check the tautness of the cable. You can see that there is probably a lot more slack in the system than there was before. Better to get this over with now instead of having to continually adjust your derailleur out on the trail while the system beds in.
Comprehension (oh boy)
So conventional thought would be that your cables are stretching. This is pretty much completely false. Any decent cable is pre-stretched at the factory. What is happening is the housing is compressing and pushing into the housing end caps. The more segments of housing you have, the more slack you will get in the cable after stressing the system. If you ever change the cables on a bike that has full length housing (like a Scott Spark) you will see that there is still very little slack in the system even after stressing it. The fewer the housing segments, the less the system is affected by load. Not to say that full housing is better, once any system is initially stressed (properly) there will be very little housing compression in the following weeks/months. With our barrel adjusters turned all the way in we have lots of room to take up any small amounts of slack in the cable that might develop by turning them out. Phew!
Check tautness
Holding the derailleur very firmly in place, stress the system by shifting up a few gears.
There will be slack after stressing the system. Loosen the pinch bolt and take up the slack by holding the cable taught then tighten the bolt.
Step 17
Loosen the derailleur cable pinch bolt and take up any slack that may have developed by stressing the system. Holding the cable taught, re-tighten the pinch bolt. Check the tension once more, it should be as it was before we stressed the system.
Step 18
Cut off the excess cable. Leave enough extra in case you need to make an adjustment but not so much that it can get caught on something.
Install your cable end cap. I can pinch the end cap with the inside of my cable cutters. Since these are brake end caps on a derailleur cable they are a little too big so I extra-secure them with a final two pinches with the side cutters.
That’s it, you’re done! Enjoy your buttery smooth shifting.
Post in the comments if you have some extra tips!
Stay tuned.
Benno
Friday, April 20, 2012
Well worth the weight
Ohh lordy I have been suffering, yes indeed. The human race, with all its innovation and technologies. In its unyielding, unwavering, and unstoppable crusade in the name of progress............
This spectacular species is still unable to make a great mountain bike pedal. Oh sure there are mediocre pedals and certainly a lot of total crap-ola pedals. But nothing that really represents the brilliance that we are capable of. And while my own personal quest to find the One Great Pedal continues without success I am, for the time being, willing to lower my standards a little and settle for the One Good Pedal.
After suffering for a couple years on the Look Quartz I went back to the trusted Shimano XTR and life is good. The only thing stopping the 980 XTR from being great is that they are about 80 grams per pair too heavy. This is actually a considerable margin but the weight is offset by how well they function.
The XTR 980 pedals are good, not great. But certainly better than terrible which is what the Quartz are.
So there you go. The 980 XTR pedals are the best on the market. Don't even say the word Eggbeater around me.
Benno
Thursday, April 19, 2012
Accidentally did the ride I wanted to do
Wasn't planning on doing it today but I guess Pisgah isn't that huge. I mean it's massive but manageable. Started at a place called Turkey Pen and ended up riding all the way over to Black Mountain and back again. I had looked at this ride earlier and figured I would do it on my own and it would be 5-6 hours. Turns out it is really only around 3 hours and a decent pace. It actually laid the groundwork for a very awesome 5 or 6-ish hour epic ride for next year utilizing many of the most grueling trails Pisgah has to offer. So if you think you are up to the challenge then look forward to joining me on this ride next year.
Here is a look at what we did today. Can't argue with that elevation profile.
The riding here has been great this year and I am looking forward to coming back to Ontario very shortly!
Benno
Here is a look at what we did today. Can't argue with that elevation profile.
The riding here has been great this year and I am looking forward to coming back to Ontario very shortly!
Benno
Wednesday, April 18, 2012
How - To: Install/Remove pedals (like a boss)
Today I am going to show you how to remove and install pedals on your bike. This job can be quite a pain (literally) if they are stuck on there either by being installed with too much torque or being seized from corrosion. Trying to break a pedal loose with your hands will often result in slicing the crap out of your hand on your chainring which doesn’t feel very good.
Tools required
-Allen key or wrench
-general purpose grease
Step 1:
Determine which size Allen key or wrench fits the pedal. Pedals can have a spot for an Allen key on the backside of the axle or they can have a flat spot for a wrench on the axle between the body of the pedal and the crank arm. Sometimes a pedal can even have both. Go for the larger, heftier interface so there is less chance of stripping the pedal or the tool you are using.
Step 2:
Find a nice flat wall to prop your bike against. It is always best to have your bike contacting the wall in at least 2 places, I usually have it touching in 3 places. The saddle, the back tire, and the end of the handlebar. That way it is more stable.
Step 3:
Position your crank arm so that the pedal is at the bottom of the stroke. Place the tool on the spindle of the pedal so that it is mostly perpendicular to the angle of the crank.
*Remember each pedal side has different threading. An easy way to remember which direction will loosen a pedal - when you try to loosen the pedal the cranks will want to spin (freewheel) on you.
Step 4:
This is the most dangerous part requiring co-ordination.
-Grab your rear brake so the bike doesn’t move
-Step on the pedal with one foot
-Place the other foot on the tool
-Push down with both feet to crack the pedal loose
Step 5:
Now that the pedal has been broken free you can spin it the rest of the way out.
Step 6:
Clean up the threads and dab on some grease for re-installation
Step 7:
Clean up the threads on the crank
Step 8:
Carefully thread the pedal back into the crank making sure not to cross thread. Since tightening the pedal will try to move the back wheel just squeeze the back brake while you tighten it down to about an 8 out of 10 on the perceived exertion scale.
If you can't remove a pedal this way then your next step is a drill press ;-)
Benno
Tools required
-Allen key or wrench
-general purpose grease
Step 1:
Determine which size Allen key or wrench fits the pedal. Pedals can have a spot for an Allen key on the backside of the axle or they can have a flat spot for a wrench on the axle between the body of the pedal and the crank arm. Sometimes a pedal can even have both. Go for the larger, heftier interface so there is less chance of stripping the pedal or the tool you are using.
Step 2:
Find a nice flat wall to prop your bike against. It is always best to have your bike contacting the wall in at least 2 places, I usually have it touching in 3 places. The saddle, the back tire, and the end of the handlebar. That way it is more stable.
Step 3:
Position your crank arm so that the pedal is at the bottom of the stroke. Place the tool on the spindle of the pedal so that it is mostly perpendicular to the angle of the crank.
*Remember each pedal side has different threading. An easy way to remember which direction will loosen a pedal - when you try to loosen the pedal the cranks will want to spin (freewheel) on you.
Step 4:
This is the most dangerous part requiring co-ordination.
-Grab your rear brake so the bike doesn’t move
-Step on the pedal with one foot
-Place the other foot on the tool
-Push down with both feet to crack the pedal loose
A view of what my feet are doing
A view from the top. Remember to hold the brake so the bike doesn't move.
Step 5:
Now that the pedal has been broken free you can spin it the rest of the way out.
Step 6:
Clean up the threads and dab on some grease for re-installation
Step 7:
Clean up the threads on the crank
Step 8:
Carefully thread the pedal back into the crank making sure not to cross thread. Since tightening the pedal will try to move the back wheel just squeeze the back brake while you tighten it down to about an 8 out of 10 on the perceived exertion scale.
If you can't remove a pedal this way then your next step is a drill press ;-)
Benno
Thursday, February 9, 2012
If it aint broke........break it.
Alright I am a little delayed in reporting this very very sad news. In fact it was one of the most depressing and unsettling events in the cycling industry that I have ever experienced.
Take a look at these two bottles.
Oh they look very similar don't they. Well look again. There is something about that bottle on the right that might not catch your eye at first but is the source of my contempt. Check out that little bit of text on the upper right hand side, hiding behind the price tag. You see the good folks at Finish Line decided to take their absolutely perfect in every way Teflon Dry Lube and mess around with it. WHYYYYYYYYYYYY???!!! So the result is that it now sucks - big time.
The original was silky and oily but light and laughed in the face of dirt. It ran clean and just plain worked in most every condition. The new stuff I wouldn't classify as chain lube in any capacity. It is very thick and globby. It turns your chain into a white mushy mess and nothing seems to be getting lubricated in the process. Finish Line Teflon Lube, you have been disgraced. Check out the difference. Old (awesome) on the left, new (crap) on the right.
So in short - DO NOT BUY THIS LUBE. I blows big time. My new recommendation is ProGold ProLink lube and I will have a review of it in the not too distant future.
Over'n out.
Benno
Oh they look very similar don't they. Well look again. There is something about that bottle on the right that might not catch your eye at first but is the source of my contempt. Check out that little bit of text on the upper right hand side, hiding behind the price tag. You see the good folks at Finish Line decided to take their absolutely perfect in every way Teflon Dry Lube and mess around with it. WHYYYYYYYYYYYY???!!! So the result is that it now sucks - big time.
The original was silky and oily but light and laughed in the face of dirt. It ran clean and just plain worked in most every condition. The new stuff I wouldn't classify as chain lube in any capacity. It is very thick and globby. It turns your chain into a white mushy mess and nothing seems to be getting lubricated in the process. Finish Line Teflon Lube, you have been disgraced. Check out the difference. Old (awesome) on the left, new (crap) on the right.
So in short - DO NOT BUY THIS LUBE. I blows big time. My new recommendation is ProGold ProLink lube and I will have a review of it in the not too distant future.
My new favourite lube.
Actually, fortunately for myself I bought a big 250mL jug of the old Finish Line Teflon lube and have been rationing it haha.
Just lookin' after you people.Over'n out.
Benno
Subscribe to:
Posts (Atom)


